Wednesday, August 31, 2011

Almond and vanilla biscotti


Teacher's day is here! To celebrate my daughter's very 1st Teacher's Day celebration, I made some Almond Biscotti for her two teachers. To thank them for taking such good care of my baby girl!

I found a recipe from one of my cookbooks, Donna Hay - Modern Classics Book 2


We'll need :
2 cups plain flour
1 1/2 teaspoons baking powder
3/4 cup sugar
3/4 cup blanched almonds
3 eggs
2 1/2 teaspoons vanilla extract
  1. Preheat the oven to 160C.
  2. Place flour, baking powder, sugar and almonds in a bowl and mix together. Add eggs and vanilla and mix well to form a dough. Divide the dough into two.
  3. Place dough on a lightly floured surface. The dough would be quite wet and sticky, so dust your hands with flour and shape into two logs and flatten it slightly.
  4. Place logs on a baking tray lined with non-stick baking paper and bake for 35minutes. Remove from oven and allow to cool completely.
  5. Using a sharp knife, cut the logs into thin slices and placed on a baking tray lined with non-stick baking paper.
  6. Bake for another 10-15 minutes or until the biscotti are crisp.
  7. Store in an airtight container and serve dunked into espresso coffee or liqueur. Makes 40.

Since it was a present, I placed them into airtight ziplock bags and wrapped them in pink tissue paper. There enough for the both of them, plus some for our own enjoyment! Yums!


Happy Teacher's Day! Hope they enjoyed it as much as we did.

Pancakes with banana and pecan caramel sauce


As you know I LOOOVE pancakes, so I'm constantly trying new things to either put inside the pancake. Then I wondered, how about making something to go ON TOP of the pancake for a change? So I decided to make a simple caramel sauce. (Slowly cook sugar and water together until golden brown - don't stir, swirl the pot if necessary, and add a whole chunk of cold butter)

I remembered this caramelized banana thingy that Gordon Ramsey once made for an ice cream topping, so I added some ripe bananas into it. Then I remembered that I had some pecan nuts in the fridge, so I poured it into the caramel sauce.

Hmmm looks good...

Next, the pancakes! Check out this ultra cute starship trooper pancake spatular that my sis bought for me from New York. CUTE OR WHAT?!?! It's all these adorable kitchenware that makes cooking even more fun!


Well, turns out that the nuts weren't very nice. I think next time I wouldn't buy from Phoon Huat. It doesn't taste very fresh, so it affected the flavour of my sauce. But minus the nuts, it was delicious! Will try again next time with better quality ingredients. :)


Saturday, August 27, 2011

Peramakan

We were at Vivo City the other day, so we headed to the Peramakan Restaurant at the Keppel Club near the area. Of course, that is if you are driving.


If you are craving for some authentic, spicy, rich, Peranakan cuisine, this place is one of the best place to go.

Ikan Garam Assam $16.00. Red snapper fillets cooked in a spicy garam assam gravy with brinjals and ladyfingers.
Spicy and sour, this dish is great with rice. Makes me salivate just thinking about it. I love to mix the gravy with their rice and gobble down with the fresh, fleshy fish. Not a great fan of lady fingers, but I love the brinjals. I do wish they would put more vegetables in the dish. My mom would put loads of other vege like onions and tomatoes. :)

Beef Rendang $14.00. Shin beef braised till tender in spicy coconut gravy. Served with serondeng (toasted spiced coconut).

OMG this is one of my utmost favourite dish, a MUST-ORDER whenever I go there. Usually, people would use a more lean meat when cooking beef rendang, but Peramakan decided to be brilliant and used the shin instead. The result? The meat would practically MELT in your mouth as the tendons in between the tender meat is cooked till jelly-like.


*quivers....*
But like all Peranakan dishes, it is very 'jelak', which means very rich and heavy. Due to all the coconut milk, oil and spices used during cooking, don't be surprised at how full you feel after the meal even though you didn't eat much.

Sambal Kangkong $10.00. Water convulus stir-fried with dry prawn sambal (Sambal Udang Kering).

Of course, we should always have a balanced meal by eating loads of vegetables! :) Since my baby girl isn't with us, we went all out and ordered a spicy vege dish too. Nothing new, but I just love the taste.

Chendol $5.00. Home-made chendol with tender kidney beans, topped with shaved ice, gula melaka and coconut milk.

Bubor Pulot Hitam $4.00. Black glutinuous rice is cooked till tender and served with gula melaka and coconut cream.

Interestingly, even though peranakan desserts are one of the most awesome, next to Thai ones, Peramakan's desserts were only so-so. The Chendol wasn't that fantastic, and so was the bubor pulot hitam that I ordered.

Peramakan
Level 3, Keppel Club
10 Bukit Chermin Road
Singapore 109918

Tel: 65 63772829
Fax: 65 62727585

Open everyday, including Sundays and public holidays for lunch and dinner.

Lunch: 11:30 am to 3:00 pm (last order: 2:30 pm)
Dinner: 6:00 pm to 10:00 pm (last order: 9:30 pm)
http://www.peramakan.com

Wednesday, August 24, 2011

Pandan Chiffon Cake


Dad decided to come over to my place one day to make some Pandan Cakes. I guess that's our way to bond, we love to bake stuff! :) The problem was that he was a professional baker, well, he used to own a bakery, self taught, so his style of baking is more, free style. Me, being the anal one, likes everything to be perfect. So it was... challenging. Haha...

So anyway, I got this recipe from someone else, but it was altered, so I'll just called it mine. :)

PART A:
3 egg yolks
50g caster sugar
60g oil
70g coconut milk
1 teaspoon baking powder
pinch of salt
1 tablespoon pandan juice
1/2 teaspoon pandan essence
100g cake flour

PART B:
5 egg whites
50g caster sugar
1/2 teaspoon cream of tartar

Yields 4 small cakes

  1. Preheat oven 180C.
  2. Mix everything in PART A together, except for the cake flour. Sift flour into batter until combine.
  3. Whisk everything in PART B until stiff and glossy.
  4. Add 1/3 of the whisked egg whites into the pandan batter to get a light green batter. Gently fold rest of the egg whites into the pandan batter.
  5. Pour the batter into the cake tins. Give the tins a few sharp bangs on the table to release the trapped air bubbles.
  6. Place the tins into the oven at the lowest rack for about 45 minutes , or until the crust is golden brown.
  7. When the baking is done, overturn the tins and let it cool.
  8. To remove the cake, use a sharp knife and with one movement, separate the sides of the cake from the tins.

Tuesday, August 23, 2011

Little Carrot Bears

I saw this recipe on the show, James Martin Digs Deep. The chef, James Martin, started out his own garden and makes a carrot cake using the carrots he grew himself. How amazing! Anyway, I was never a carrot cake fan, but the recipe was so simple, and I thought that a carrot cake would be a delicious yet healthy snack for Jolie! Besides, I recently bought a teddy bear mould and this would be perfect for it! Yeah!


Super cute right.... Yeah, the features of the bear wasn't very clear, but it was obvious enough that it's a bear. And Jolie loved it, so does her classmates!

So we need:

2 large sized carrots, sliced (those big fat ones sold in the market)
1 orange, juice only
63 ml corn oil
187 g caster sugar
2 eggs, separated
175 g plain flour
7 g baking powder

Method

  1. Preheat the oven to 180C
  2. Place the carrots in a pan, just cover with water and add the orange juice and drop the orange skin into the pan as well. Bring to the boil and cook until tender. Drain and discard the orange peel, but do not cool.
  3. Put the carrots, corn oil, sugar and egg yolks in to blender or food processor and blend to a purée. Leave to cool.
  4. Whisk the egg whites until stiff and set aside.
  5. Place the carrot purée in a mixing bowl and gently fold in the flour and baking powder and mix well together. Gently fold in the egg whites. Pour the mixture into the prepared tin and bake for 10-15 minutes until golden and cooked. Remove from the oven and leave to cool on a wire rack.

The original recipe was double the amount and uses a cake pan, but I was using a mini mould, so I halfed the quantity and baked only until it's golden brown, which was about 10-15mins. It tasted great, but I think I over worked the cake mixture, making the texture more like a "kueh" then a fluffly cake, so remember not to mix it too much!

But everybody loved it so much, (including me) that would definitely make it again. But the mould was really difficult to work with, so next time I'll probably grease it with butter. Enjoy!

Thursday, August 11, 2011

db Bistro Moderne

Today we celebrated our 4th traditional wedding anniversary! Four year ago, we had our traditional wedding ceremony and had celebrated our union with our wedding dinner. :)

This year, we had decided to try out one of the many celebrity restaurants at Marina Bay Sands. I've been itching to try them as I watched the chefs on TV all the time, but they aren't exactly cheap, so we had to wait for a special occasion first! After some consideration, we chose Daniel Boulud's bistro,(pronounce:dan-YELL boo-LOO) db Bistro Moderne

They have a set lunch menu, but we wanted to choose our own dishes, so we ordered ala carte instead. For starters, we ordered FOIE GRAS POELE and ASSIETTE LYONNAISE.

FOIE GRAS POELE
2 slices of pan fried foie gras with figs S$38.00


OMG have I told you how much I adored pan fried foie gras? I know it's cruel to the goose, but, have you tasted anything so divine? I thank the poor goose for this sex on a plate. :) The crust is nicely pan fried, so there's a thin layer of caramelised crust. Inside, it was nutty and melts in your mouth like the finest butter ever. Each bite would render us speechless, so we could only give each other the "Oooo...it's so gooood!" look on our face.

ASSIETTE LYONNAISE
Selection of House Made Terrines & Cured Meat with Pain de Campagne Toast S$26.00


My starter wasn't as exciting, but it was really good anyway! I love the various types of cured meat and sausages. Even though some were a little salty, it was great with the grainy mustard and the toast.

For the main, I ordered the lamb while hubby ordered Daniel Boulud's famous burgers.

LAMB DUO
2 pieces of grilled lamb served with mint sauce, couscous and grilled kebab S$44.00


This was one of the best lamb chop that I have ever had. The meat was juuuuust cooked, but not raw, so it was super tender. But the little meat stick at the side was a little too salty. Also, I discovered that I don't know how to appreciate couscous. I always see it on tv, and it looks delicious, but, I don't know how to describe it, I just don't like it.

You know, the annoying thing about fancy restaurants is their nosy captains. I know they needed feedback on their food, but I really felt kind of pressured when they asked me how was the food. Well, when it's good, like the foie gras, I would be gushing my praises, but when I didn't finish my couscous, he would asked me (in a very polite way) if there was anything wrong with it. It kind of made me feel embarrassed and guilty, like a child having to explain why didn't she eat her greens. :P

I JUST DON'T LIKE IT, IT'S ME, NOT YOU...

Anyway, moving on...

THE FRENCHIE BURGER
Beef Patty Topped with Confit Pork Belly, Caramelized Onions, Morbier Cheese, Arugula, Cornichons served on a Black Pepper Bun S$26.00

The burger was delicious! The patty was meaty, nice char-grilled flavour on the outside, moist and tender on the inside. And the buns was so nice! But it was huge, felt kind of embarrassed to open my mouth SO BIG in order to give it a try. But it was yummilicious!

After the foie gras and the huge burger, hubby had to throw in the white towel and skipped dessert. But I don't have to! Yeah! Everything on the menu sounded so good! So in the end I ordered the profiteroles, which is a very frenchy term for cream puffs.

PROFITEROLES
Profiteroles with vanilla ice cream, pecan nuts, white chocolate with warm caramel sauce S$15.00


The waiter placed the dish on my table and poured warm caramel sauce on the white chocolate disc on top of the profiteroles. I didn't expect much, but when I took a bite, I wanted to cry!

IT WAS MUTHERF**KING GOOD!!!!!

I don't understand, it was such a simple dish, with such simple ingredients. Why is it so good? I pondered as I scooped, spoon after spoon of goodness. Then I realised. It's the proportions and the compatibility of all the ingredients! The puff was firm enough not to get soggy in the ice cream and they tasted great together. The ice cream was rich, creamy and delicious, and it tasted great with the pecan nuts. The melted white chocolate and the caramel was not too sweet but rich enough to compliment the ice cream and the puff. It was simply, a perfect dessert. So happy!!!

So that ends another very delightful meal. Of course, the bill was not so delightful, after adding taxes and stuff, it was about S$200 plus. And we didn't even order wine!(Hubby under medication) But it was worth EVERY cent as it was such an enjoyable experience. The bistro was beautiful but casual, so it was nice and comfortable, the service was great and most importantly, the food was excellent.

Thank you db Bistro Moderne, and happy anniversary my dear!

Monday, August 8, 2011

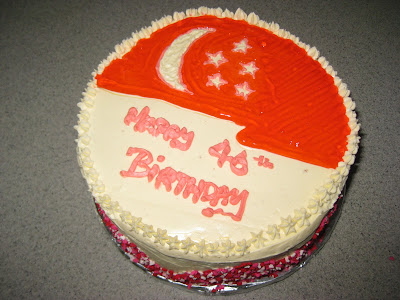
National Day Cake 2011

Happy National Day! My daughter, Jolie, was having a little celebratory party in her playgroup, so I thought I make a National Day cake!


Nothing new, I just used back the recipe from her birthday. But instead of chocolate buttercream, I made vanilla buttercream by opting out the cocoa powder and added 1 tablespoon of vanilla extract. I wanted to make a flag design, so I needed a white background.


I have this design in my head, but I didn't realise how difficult it was to make the stars and crescent moon until I actually started doing it. The stars were very small, so it was really hard to make the pointed ends of the stars. So I used a little buttercream to make an outline of the stars and crescent moon 1st before filling up the top of the flag with piping jelly mixed with a few drops of red food colouring.

It's not pretty, give me a break, it's my 1st time ever...

I tell you, I have a new found respect for bakers and their piping skills. Phew! I'm not a fan of food colouring, so if I wanted a really red background, either I have to put LOTS of colouring into the white cream (eww...) or just 2-3 drops into the piping jelly. I bought this piping jelly - neutral, from phoon huat. It's clear, so you have put any colour you want in it. It has a slight sourish flavour to it, but other than that, it's pretty alright.


If you look closer, I also bought little pink heart shaped sprinkles and added it to the sides. They looked so sweet! My cake is literally full of 'love'! Haha... *^,^*


I made a little mistake. I put the buttercream into the fridge after I made them (I don't know why) instead of using them immediately, so it turned a little stiff and I had a hard time spreading them onto the cake. I must have pressed the cake a little too much and it squished the cake a little. Also, I think I was a little heavy handed on the cream, so I felt that it may have turned off some of my "customers" at the party. But overall, I was very happy watching others enjoy my humble creation. All the hard work paid off. Promise that next year it would be even better!

Wanna read about the party? Click here!

Saturday, August 6, 2011

Miss CoCo's Home Made Waffles

I've got a new toy! My sister stays in Hong Kong, and near her place is a street named 上海街 (shanghai street) that sells ALL sorts of amazing wholesale stuff such as kitchen appliances and ANYTHING you need in a kitchen. So when my parents were visiting, I kindly asked them to help me buy a waffle maker! So here is my new toy!


By the way, this brand, Aunt Jemima, makes awesome pancakes. I used to buy their frozen mini pancakes, but their pancake mix is just as good.

Anyway, you can use their mix to make waffles too, so I did that and made my very first batch of home-made waffles.


Honestly, I was a little disappointed as I like my waffle like those at Geláre, crispy on the outside, light and fluffy on the inside.


Mine wasn't as crispy, in fact, it was like pancakes in the shape of waffles. -_- The second time I did it, I made sure that the waffle iron was nice and hot, quickly poured the batter in and closed the cover. True enough, the crust was more brown and more crispy than the 1st time. Still it wasn't good enough. I will try another recipe next time, probably something made from scratch. Will keep you updated!
Related Posts Plugin for WordPress, Blogger...