Hi all, due to circumstances, I'm moving my blog to this new place, MissCoCoEats2
With 2 babies, I now have to juggle more and more things in my life, but food is still my passion so I will try to update the new blog more often, I promise! Also, I'm starting my very own YouTube cooking videos, so you can check them out HERE! Remember to subscribe! Cheers!

Friday, May 23, 2014
Wednesday, October 26, 2011
La Forketta
Once in awhile we like to visit Dempsey Hill and try out the restaurants there. One evening we decide to try out this Italian restaurant. It looks good and we sat outside in the cool evening air. We were off to a great start as the bread basket they put down was absolutely delicious!

It was SO good with extra virgin olive oil and balsamic vinegar! The problem was that we had to fight the bread with our 2 year old girl, who insisted that the bread was hers. -_- We also ordered their minestrone soup, which was like the most chunky minestrone soup I've ever seen. I think they should just call it vegetable and tomato soup. Duh. I prefer that the vegetables in my minestrone to be boiled to death and unrecognizable. Haha...

Cobby ordered a cured beef with wild rocket pizza and I wished that I've ordered that instead. :P

The naughty girl ate so much bread, she couldn't eat anything else.

I ordered the tagliatelle al ragu, which was alright, but it was a little too salty and the pasta was a little too soft for my taste.

I would probably not go back for their pasta, but pizza's pretty good. Go check it out.
Saturday, October 1, 2011
Seoul Yummy
The last time we were here, I was out with my girlfriends, celebrating a birthday. We just chose this restaurant as it has the shortest queue, but it turned out to be a pretty good choice as all of us agreed that the food was quite good. I remembered thinking that I would bring Cobby here some other time, so one Saturday, I did!
As usual, there wasn't any queue. I don't know why, I guess everybody's there for Japanese food. The last time I was there, we ordered kimchi soup with rice.
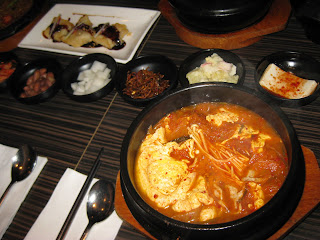
I love kimchi soup, and this was really good. The ingredients was generous and the soup was so flavourful! Perfect with the fluffy rice!
Another one of the highlights was their side dishes. It's quite common to have several free flow side dishes when you go to a Korean restaurant, but their side dishes was super awesome! My favourite was their cold toufu, which was garlic-ky and slightly. Cobby loved their crispy sweet and savoury ikan bilis. Yum!

When I went with Cobby, we ordered the spicy beef soup. Not bad, the meat was quite tender, but not as fabulous as the kimchi soup.

We also ordered the bibimbap. Not bad too, but honestly, the one at Wisma's Food Republic's better.

Overall a hearty and delicious meal. Would probably go back when I have a craving for a hot bowl of kimchi soup with rice. :)
The Central,
6 Eu Tong Sen Street,
#03-92/95, Singapore 059817
Thursday, September 29, 2011
Mother-in-law's pa-mee (打面)
Everyday you learn something new...
My mother-in-law is heng hua dialect, so one night when we were over at her place for dinner, she cooked a huge pot of what they called, pa-mee (打面). I'm not sure how authentic is it, but it's delicious!

She bought this noodles from the market near her place, and I loved it as it doesn't have the alkaline taste like in those "yellow noodles".

So she gave me a packet and I tried to make a pot one evening. I'm not sure how, but I guess the main things would be the soup base, ingredients and the noodles.
Soup Base
Chicken breast, with bones
Ginger, one thumb size nob, smacked with a knife
Salt
Chicken powder
Boil for an hour, skimming off any excess oil or scum. Remove chicken and ginger.
Ingredients
Shitake mushrooms
Pork shoulder, sliced
Cai xing
Toufu fish cakes, sliced
Put everything into the soup base and boil until pork slices are cooked. Adjust flavour accordingly, it should be slightly more salty than usual to balance out the bland noodles.
Noodles
Put raw noodles in a big bowl, pour boiling water into it and swish it around for a few seconds before pouring away the water. Run under cold water for a few seconds and set aside.
When the soup is ready, add in the noodles and boil for not longer then a minute. Serve!
It's delicious, easy to make, and everybody in the family loved it. Definitely a recipe to keep!
Wednesday, September 28, 2011
Miss CoCo's Virgin Mooncake

Took a leap of faith and made my very first batch of mooncakes. Well, the first batch was made from a recipe I read on the newspaper, by some chef at Capella hotel. No offence, but it turned out like crap. Looks like I still have lots to learn, I'll summarize all my learning points at the end of the blog.
Since I've already bought a whole kilo of white lotus paste, might as well try again, so I searched the web for a recipe for traditional mooncakes, (only from trustworthy bloggers this time) and found this recipe from Anhsfoodblog. Turns out quite ok, but I did make some slight adjustments.
Here's what we need:
Skin:
120g golden syrup
40g cooking oil
160g plain flour
¼ tsp baking soda
Filling:
white lotus paste
Eggwash:
1 egg beaten with a little milk
- Preparing the skin - Combine the golden syrup, cooking oil together. Mix in the plain flour and stir until you have a smooth paste. Cover, leaving the dough to rest for a few hours.
- Filling portion - Big mooncake - wrap 50g : filling 130g Small mooncakes wrap 25g : filling 35g
- Wrapping – this steps requite a bit of practice. Make sure when you wrap the filling, no additional flour is around. Start by flatten dough slightly with your hand, then put the filling ball in the middle. Gently wrap the dough all around the filling with smoothing and rounding motion. Be gentle not to break the skin.
- Shaping – Gently dust the mould with flour, the tap off any excess. Very lightly, dust the ball with a little flour. Press the mooncake ball into the mould. Knock the mould to release the mooncake. Repeat with the rest.
- Baking - Place the mooncakes onto the baking tray, lined with baking paper. Bake them in a preheated 200C oven for 7-10 minutes.
- Take the tray out, and wait until the cakes cool down for 30 minutes. Use a pastry brush, brush a light coat of eggwash onto the mooncake (just the top, don’t brush on the side of the cake). Return the tray to the oven, and bake for further 10-12 minutes or until golden brown.
- MOST IMPORTANT - Let the mooncake rest for at least 3 days before consumption. In Cantonese, we called it 出油, where the oil from the lotus paste and yolk would slowly seep into the mooncake skin, making it shiny and soft.
So with that in mind, next year when you are buying mooncakes, please don't ask the vendor if it's fresh, because there's no such thing as a "fresh" mooncake. Freshly baked mooncakes are hard and dry and terrible in taste!


So with that in mind, here are my notes for making home-made mooncakes:
- Prepare early, minimum 1.5 months! As mentioned earlier, you need to keep freshly baked mooncakes for at least 3 days. Also, traditional mooncakes need a special sugar syrup that's made at least a few days to a few months in advance. The sugar syrup would darken over time and the brown syrup would contribute to the rich brown colour of the skin. My dad used to own a bakery and they would make the syrup at least 6 months in advance! Seriously!
- Add salted egg yolk. It doesn't matter if you like yoke or not, you should add it anyway. The oil from the yolk would slowly seep into the skin, adding flavour and improving texture.
- Use good quality paste. On top of flavour, good quality paste also have higher oil content, so again, contributing to the oiling of your mooncake skin.
- Dough should be wet. If your dough is wet and damn difficult to wrap the paste, you probably got it right. They never said it was easy!
- Eggwash - Go easy! If you brush on too much, the delicate pattern on the mooncake would be distorted.

I guess that's it. I've definitely underestimated the complexity of making a traditional baked mooncake. It's so simple yet difficult all at the same time! I would learn from this and make even better ones next year. But seriously, if you aren't a baking enthusiast, it's not worth the effort. Go buy a box and enjoy! Leave all these craziness to the crazy ones. :)
By the way, I'm submitting this very special post to Aspiring Bakers #11: Mid-Autumn Treats (September 2011). Hope all readers enjoy my little post!
Subscribe to:
Posts (Atom)